About WombatDialer Blog
Boost your Asterisk call-center productivity with the Next Generation in Predictive Dialling: WombatDialer!
Highly scalable, multi-server and easy-to-use platform.

Tags
18.08 - 20.02 - 21.06 - 23.12 - AMD - APIs - Asterisk - CSV - Dial - Docker - Elastix - FAX - IVR - JSON - Monitor - PBX - PBX in a flash - PIAF - QueueMetrics - Status - WombatDialer - automatic recall - blacklist - call back - call center - campaign - contact centre - copy campaign - dialer - email notification - end points - handle peak - inbound calling - outbound - outbound calling - performance - power dialing - predictive dialer - preview dialing - queue - recall - release - remote working - reverse dialing - social dialer - social media - telemarketing - voip

Outbound IVRs and dr. Strangelove


A Dr. Strangelove just called, saying he needs your help for an automated appointment reminder system. Dr. Strangelove is tired of patients forgetting appointments, so he needs a way to call them the day before and making sure they will be there at the right time. Also, as he specializes in every possible thing, he needs to know what the appointment will be about so he can either have an operating room ready to remove your appendix or his psych couch cleaned and stocked with a large supply of paper towels. Do you think you can help?
After calling him, you understand that he wants a system that will not only connect to a list of numbers and handle common issues (busy calls, non-answers, etc) but also a system that is able to detect whether the callee actually confirms receipt of the message. If they do, that’s okay; if they don’t, a new call is placed after a while.
He also wants a system that is able to synthesize a custom message for each call, and that is able to gather data from the callee and pass it along to his office management system as it is collected.
Doing this with WombatDialer is easy; it is basically a matter of implementing an outbound IVR and tracking call parameters and call completion codes. Doing so will also let us show how WombatDialer handles call retries. As an added bonus, we’ll see how WombatDialer notifies other systems over HTTP.
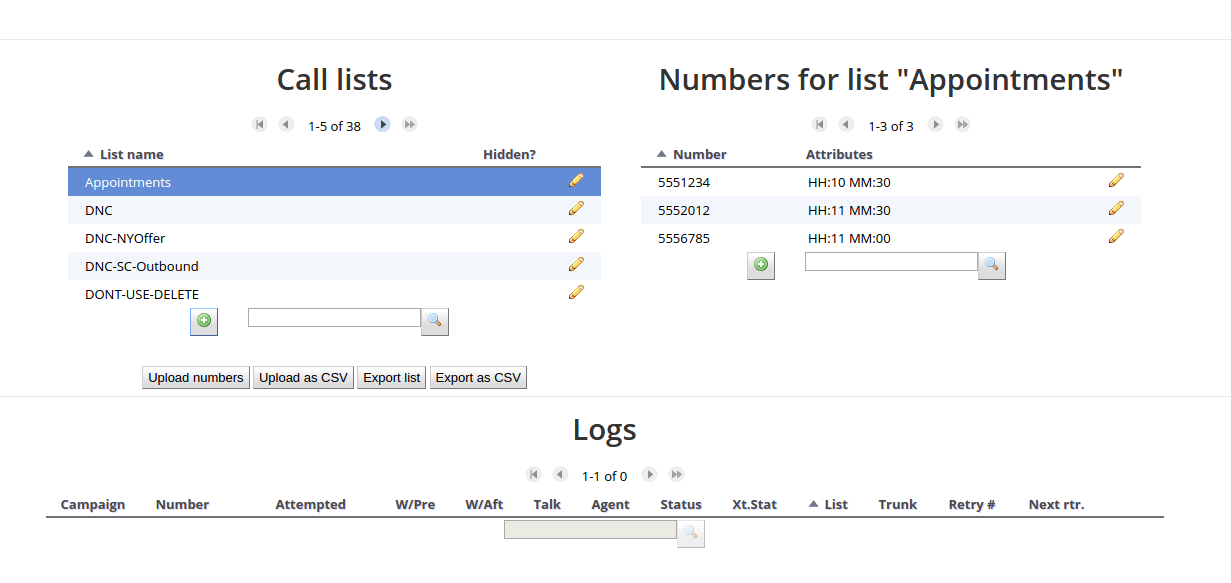
To get us started, we create a list of telephone numbers called “Appointments” with custom attributes; in order to do this, we log in to WombatDialer, go to the Lists page and create a new list. After creation, we select it and upload a list of numbers like the following one:
5551234,HH:10,MM:30
5556785,HH:11,MM:00
5552012,HH:11,MM:30
This means that the person at number 5551234 is to be reminded an appointment for tomorrow at 10:30. We use two separate variables as this makes life easier for our Text-to-Speech engine.
We now have to program the outbound IVR context in Asterisk; we can do that easily with the help of WD call attributes so that we know what we have to tell our customer. In this example, we will also use the Google Text-to-Speech engine to synthesize audio on-demand.
[drstrangelove]
exten => s,1,Answer
exten => s,n,Set(TIMEOUT(response)=5)
exten => s,n,UserEvent(CALLSTATUS,Uniqueid:${UNIQUEID},V:0)
exten => s,n(start),agi(googletts.agi,"Your appointment with doctor
                strangelove is for tomorrow at ${HH} ${MM}")
exten => s,n,agi(googletts.agi,"Press 1 for to book for major surgery
                press 2 for psychiatric counseling.")
exten => s,n,Read(type,,1)
exten => s,n,GotoIf($["${type}" = "1"]?appe)
exten => s,n,GotoIf($["${type}" = "2"]?psyc)
exten => s,n,Goto(start)

exten => s,n(appe),UserEvent(ATTRIBUTE,Uniqueid:${UNIQUEID},APPT:APPE)
exten => s,n,agi(googletts.agi,"You choose the appendectomy.")
exten => s,n,Goto(confirm)

exten => s,n(psyc),UserEvent(ATTRIBUTE,Uniqueid:${UNIQUEID},APPT:PSYC)
exten => s,n,agi(googletts.agi,"You choose psychiatric counseling.")
exten => s,n,Goto(confirm)

exten => s,n(confirm),agi(googletts.agi,"Thank you! Now press 1
                to confirm the appointment")
exten => s,n,agi(googletts.agi,"or 2 to cancel it.")
exten => s,n,Read(conf,,1)
exten => s,n,GotoIf($["${conf}" = "1"]?ok)
exten => s,n,GotoIf($["${conf}" = "2"]?ko)
exten => s,n,Goto(confirm)

exten => s,n(ok),UserEvent(CALLSTATUS,Uniqueid:${UNIQUEID},V:1)
exten => s,n,agi(googletts.agi,"The appointment was confirmed.
                See you tomorrow.")
exten => s,n,Hangup

exten => s,n(ko),UserEvent(CALLSTATUS,Uniqueid:${UNIQUEID},V:2)
exten => s,n,agi(googletts.agi,"Boo the appointment was cancelled.")
exten => s,n,Hangup
Notable points in the code above are:
- Custom call attributes
HHandMMare passed along with the phone number so we can know what to tell each client. - We set the call status to “0”, “1” or “2”. “0” means that the call was connected but no choice was made, “1” means that the appointment is confirmed and “2” is that it is cancelled
- We generate some UserEvents in order to populate the outbound (that is, coming from outbound) attribute
APPTwith the patient’s choice.
We now have to create an end-point for our campaign that points at extension s@drstrangelove so that WombatDialer knows where to connect successful calls. We will also need at least one trunk to send calls through – to get us started it is advisable to have a “dummy” trunk routing everything to a local extension.
If you have not already done so, it would be advisable at this point to have a look at our previous tutorial to see how to create and control a simple campaign.
When done, we create a new Campaign to connect all pieces together.
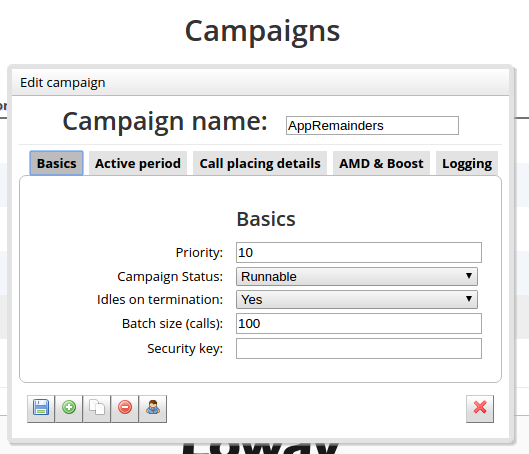
We set the campaing to be idle on termination, so that we can add more numbers over HTTP when they become available. We also program it to be running only between 8AM and 6PM, every day of the week, so we don’t call people in the middle of the night if a nightly job is used to load new appointments every day.
We also set a forced closure after 90 seconds so that if the call exceeds a duration of 90 seconds, it is automatically hung up to prevent using valuable resources on a call that is likely invalid.
As a last measure, we set the logging format to QM_COMPATIBLE (so that we can observe activity via QueueMetrics) and enter the HTTP notification URL of Dr. Strangelove’s office management system to be notified of call events (see below for more information).
We then complete the campaign by adding a trunk, our new end-point with the outbound IVR and our Appointments list.
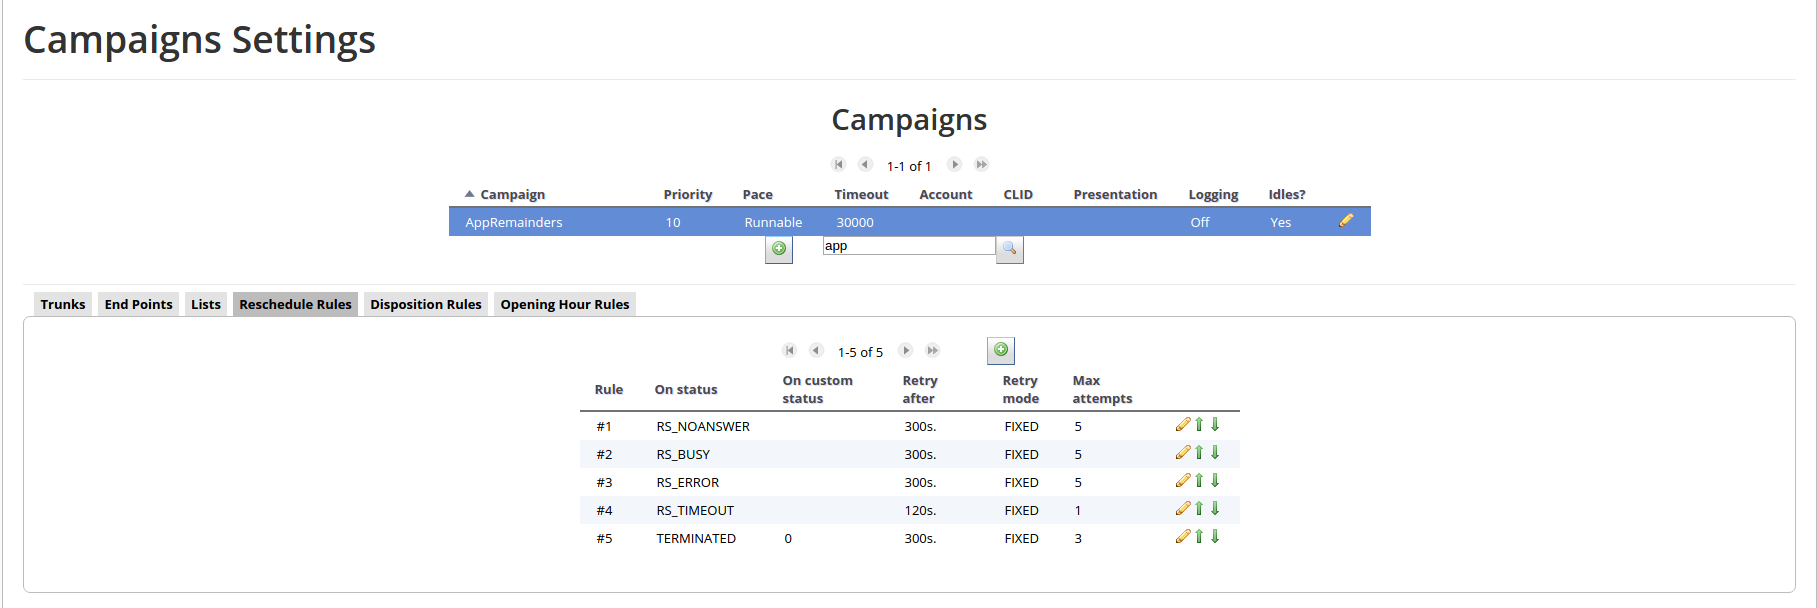
As a last step, we create a set of Reschedule Rules that implement the retry logic.
- If the call is unanswered, busy or in error, we retry every 300 seconds for up to five times.
- If the call times out because of a forced closure, we retry after 120 seconds.
- If the call completes naturally but its extended status is 0 (no choice), we retry it for up to three times after 300 seconds each.
- If a call completes naturally but its extended status is not 0, then it is not retried.
Now it is time for us to start the campaign – make sure the WD is running, go to the Live page, select your campaign and run it. If all goes well, you should start receiving calls on your test extension.
While the campaign is running, you can add more calls to it via HTTP by issuing:
curl "http://server:8088/wombat/api/calls/index.jsp?
 op=addcall&campaign=AppRemiders&number=45678
 &attrs=HH:12,MM:15"
and you can even specify a minimum time for calls to be placed at, like e.g.
curl "http://server:8088/wombat/api/calls/index.jsp?
 op=addcall&campaign=AppRemiders&number=45678
 &attrs=HH:12,MM:15
 &schedule=2012-06-01.10:00:00"
When the campaign terminates, it will be in IDLE state. In order to close it, first pause and then remove it.
After a successful run, you can see its statistics, by viewing the Campaign Report screen:
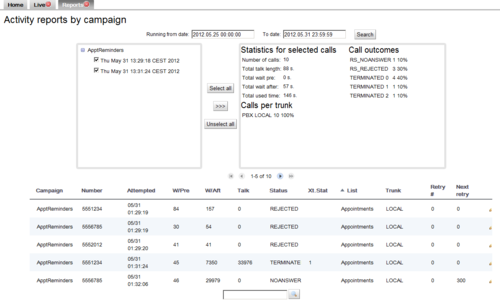
You will see that some calls appear as TERMINATED 0, some as TERMINATED 1 and some as TERMINATED 2, based on the extended call status entered through a user selection. Only calls in state TERMINATED 0 are retried.
You can also see the state of attributes for each call by going to the List editor:

You see that calls successfully placed will have an APPT attribute that is either “APPE” or “PSYC”; also you will see a complete log of activity for each number.
As a last item, you’ll remember we enabled HTTP notification. This basically POSTs the result of each call to a HTTP server, where you could have a simple PHP script to parse it, like in the following example:
<?
$out = "";
foreach($_POST as $name => $value) {
   $out .= "$name:$value ";
}
print($out);
error_log("RQ: $out",0, "", "");
?>
The script above basically logs all activity on the HTTP error log. What you get is a sequence of calls like:
RQ: num:5551234 reschedule:0 I_MM:30 extstate:
     state:RS_REJECTED I_HH:10 retry:0
RQ: num:5556785 reschedule:0 I_MM:00 extstate:
     state:RS_REJECTED I_HH:11 retry:0
RQ: num:5552012 reschedule:0 I_MM:30 extstate:
     state:RS_REJECTED I_HH:11 retry:0
RQ: num:5551234 reschedule:0 I_MM:30 extstate:1
     state:TERMINATED I_HH:10 O_APPT:APPE retry:0
RQ: num:5556785 reschedule:300 I_MM:00 extstate:
     state:RS_NOANSWER I_HH:11 retry:0
RQ: num:5552012 reschedule:0 I_MM:30 extstate:2
     state:TERMINATED I_HH:11 O_APPT:PSYC retry:0
RQ: num:5556785 reschedule:300 I_MM:00 extstate:0
     state:TERMINATED I_HH:11 retry:1
RQ: num:5556785 reschedule:300 I_MM:00 extstate:0
     state:TERMINATED I_HH:11 retry:2
RQ: num:5556785 reschedule:300 I_MM:00 extstate:0
     state:TERMINATED I_HH:11 retry:3
RQ: num:5556785 reschedule:0 I_MM:00 extstate:0
     state:TERMINATED I_HH:11 retry:4
You see that for each call:
- num is set to the number dialed
- state is the call state at its completion
- extstate is the call’s extended state, if present
- retry is the retry counter
- reschedule is set to the time to be waited before a reschedule; if no reschedule is necessary, it will be set to zero
- all inbound attributes (the ones you set with the telephone number) are passed along prepended by I_
- all outbound attributes (the ones you read from the callee), if any, are passed along prepended by O_
This way you can easily create an integration script that stores the results of the call on a database or passes them along for furter processing.
Further developments
- By connecting multiple trunks and end-points residing on multiple servers you can scale this example up to hundreds of parallel lines
- If you have clients living in different time zones, you could have multiple campaigns active with different time windows to place calls
- It is often a good idea to set call attributes that are not actually used by Asterisk (e.g. a patient ID) but make life easier for third-party systems to find out what the call was about.
The Google-TTS script used is available at: http://zaf.github.com/asterisk-googletts/